I’m sorry, I couldn’t resist.
As things were opening up a tad (now closing again, thanks to Omicron and, more personally, the fact that my mom is now immunosuppressed due to chemotherapy) I got invited to some events, because apparently I have friends now.
I met Hannah (@chai_and_parche on Instagram) over, well, Instagram, and it turns out she’s quite local to me, since she lives up in Sacramento. She also invited me to a couple of small events that she was hosting with friends. I really appreciated that, because I’m not emotionally or physically up for big groups at the moment, but it’s always nice to have an excuse to get out and dress up.
Slight problem with that, though. The first event was a Regency Faerie court, which I didn’t end up attending because I got sidetracked making a whole new bias-cut Spanish 14th C dress because I wasn’t going to show up to two reenactment events in a row wearing the same dress, my goodness, that would be embarrassing. As a result, no Regency Faerie dress, and that was right after mom’s surgery anyway so I visited her instead.
The other event was to wear to visit an exhibit of Impressionist paintings, so the theme was late Victorian. Now, I have most of a natural form ensemble made, it’s just…. in a box? On a boat? Which, at the time of this event, was in Hamburg. Nowhere near me.
I can make a whole bustle ensemble on a deadline, right? Right????
About a million years ago (or the fall of 2017, more accurately) I attended a wedding in Connecticut right after I started making costumes. Because there’s no point flying across the country for one weekend I spent a few days in New York City and then took the train up to the wedding. While in NYC I went to Mood Fabrics and uh. Bought some fabric.

Although as a digital print it’s not technically accurate, it felt super Victorian to me at the time (and still does). I originally intended to make an early bustle ensemble with it but got swept up in 15th and 16th century costuming and just….never got around to it. But suddenly I had an event that called for a bustle dress, and I couldn’t find anything else I liked as well as this, so I pulled it and some matching blue cotton sateen out of storage and went at it. I also cheated and used my Regency shift and a modern underbust corset so that I didn’t have to make those, too.
The first step was to make a bustle. I just used TV 101 without modifications because I had the pattern, it’s simple, and it stores flat. I had also at one point bought pre-cut boning for it from Truly Victorian, which sped up the process immensely. I don’t have pictures of the bustle by itself but it’s a protruding rear cage covered in ruffles, I’m sure you can imagine. I just used an inexpensive cotton poplin from Dharma Trading and it worked great.
For the skirt I decided on Truly Victorian’s 1870 trained skirt ensemble (TV 208), mostly because this fabric is so elaborate that I wanted something simple to show it off. I’m sure the actual Victorians wouldn’t have let that stop them and thrown a ton of trim and ruffles at it anyway, but that just didn’t seem necessary. Also, I was still on a deadline.

The skirt went together quite quickly, although as you can see here it was definitely in need of some hem facing! After much deliberation I ended up buying some starched crinoline (not the net, the stuff that’s like tarlatan) but it was extremely stiff. If this skirt was a heavy wool or velvet I think it would have been fine, but it was far too much for this lightweight cotton. There was so much starch you could see membranes of it between the threads of the weave, like when you cast an adhesive film that is far too heavy.
That might be a reference that only makes sense to other textile conservators. Oops.
It’s difficult to remove starch completely– my friend Anna actually did their dissertation for our MPhil on this topic–so I filled up a pot of lukewarm water and dunked bias-cut strips of the crinoline in. I then let it soak for a bit and pulled it out and pressed it flat. Et voila– still stiff, but no where near as rigid as it had been. Now, to face the hem.
In the past I’ve always done this with plastic horsehair braid (the kind you use for millinery) because it can easily be stretched and adapted to curves. I wanted to use something more period this time, though, so I went for the crinoline instead. Even with the excess starch removed this wasn’t going to stretch around the train, so I had to do something else to fit it correctly.
My process ended up like this.
- Pin the hem. I’ve started doing this by putting my laptop on the floor and using the webcam, because I live by myself and even when my mom is convenient she always has an existential crisis about getting the hem right. It’s easier just to do this myself.
- Press the hem
- Place the bias-cut strips of tarlatan with the bottom edge fitted into the pressed hem. There will be excess material at the top because of the gored skirt panels. Ignore that, although you will want to place a pin along the top edge every once in a while.
- Flip everything over and press it smooth and flat from the outside, adjusting pins and the materials as necessary. This will be annoying, but just keep working at it until everything is aligned.
- Flip the skirt back over so you have access to the inside, and you will find that creases have been pressed into the tarlatan to fit it to the skirt. Pin everything in place, and stitch down with the method of your choice.
And now…. you have a faced and hemmed skirt! You can add hem braid or whatever if you like, but I ended up just cutting the shape of the train out of leftover cotton poplin and basting that in to the underside to try and keep the train clean. This did not work (there was mud), but at least I tried. And using a rigid hem facing keeps the train from being as deflated as it looks in the pre-hem picture.
Once the skirt was done I could get a start on the bodice– you don’t want to do it the other way around mostly because you have to fit the bodice over the skirt to make sure the flare sits properly. Slightly unfortunate, that, because the bodice is the slow part.

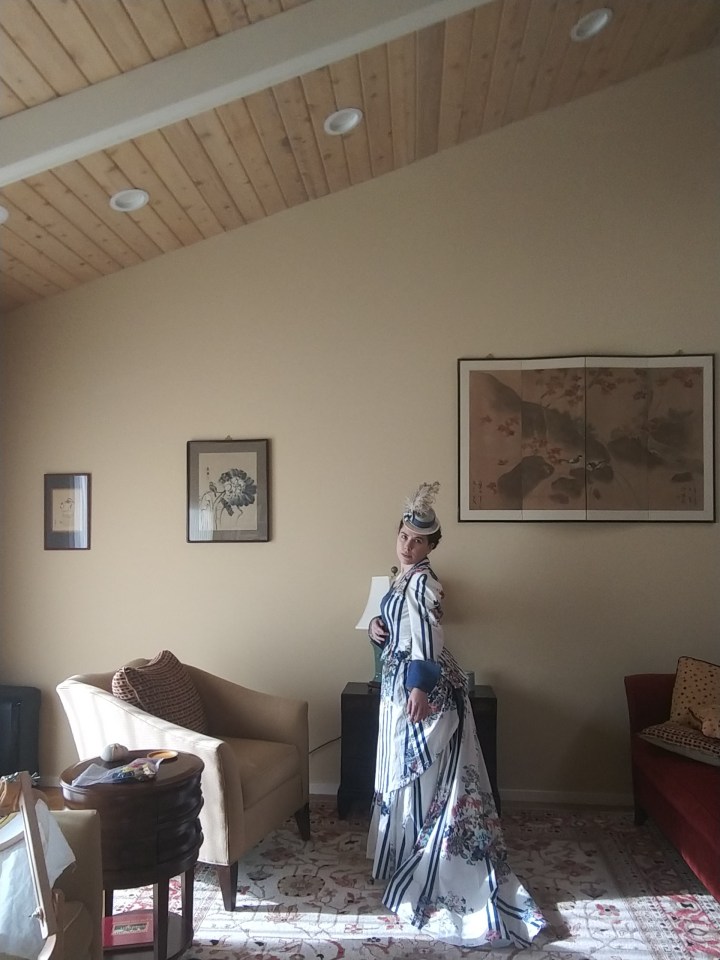
But, being me, I wasn’t willing to skimp on the details. The collar and cuffs are padstitched, the stripes are carefully arranged to be symmetrical, and all the buttonholes are done by hand. After trying two or three times to buy matching buttonhole twist on the internet and failing (the blue here is a subtle green/grey/blue that’s really hard to identify online) I ended up using some Devere’s silk I already had on hand. I’d bought it for sewing, though, not buttonholes, so it was really too fine for what I was doing and the first couple looked a bit….wonky. Adding an additional facing layer might’ve been a good idea, as well as flatlining the sateen. The rest of the bodice is only two layers, but to have a finished edge at the center front the false “vest” panels are sewing wrong sides together and then turned. Flatlining the sateen with hair canvas would probably helped with the wrinkling.
I also threw a hat together real quick, with a purchased sinamay base and some bits of trim from fabric scraps. It probably needs more, to be honest, but I’m bad at hats! There’s a reason I usually buy them!

I’m pretty happy with it, on the whole, although it turns out that the moment anyone else points a camera in my direction my brain goes offline so there’s a lot of pictures like this:

On the whole I’m pretty happy with this but it definitely needs undersleeves which I just ran out of time for. I bought some lace cuffs from Augusta Auctions and some of those will probably end up here. Also, more ruffles are still needed at the back to support the train.
