This….is gonna be a long one.
Way back in the summer of 2019 my mom and I took a long weekend to travel to LA. The main reason for our trip was to visit the Getty Center, but we stopped by the fashion district as well….and dropped some money.
I ended up purchasing 8 yards of changeable silk taffeta and 5 yards of black voided velvet in a late-period style, which really did not fit in with any of my existing costuming plans! But when life gives you silk taffeta for $12/yard, you change your plans.
I started looking into high-class fashions of the late 16th century and found what I, at the time, called “Spanish Style Italian” fashions. In actuality these are clothes of the late 16th C (mostly 1560s-1570s) from Florence, which at the time is very different from the fashions in other parts of Italy.

Venetian fashions of the 1570s
Tintoretto, Portrait of a Lady

Florentine fashions of the 1570s
Alessandro Allori, Portrait of Eleonora da Toledo
While late 16th century Venetian gowns often feature open fronts, low necks, and ladder lacing, the Florentine styles show more layers including a high-neck doublet (giuppone) and overgown (veste). This echos the Spanish styles of the same period, although they are less….extreme.

Anthonis Mor, Anna of Austria, Queen of Spain
You do also see a number of Florentine women in this period wearing what I call, for lack of a better term, a “fluffy” partlet. I’ve shown some examples of this below.


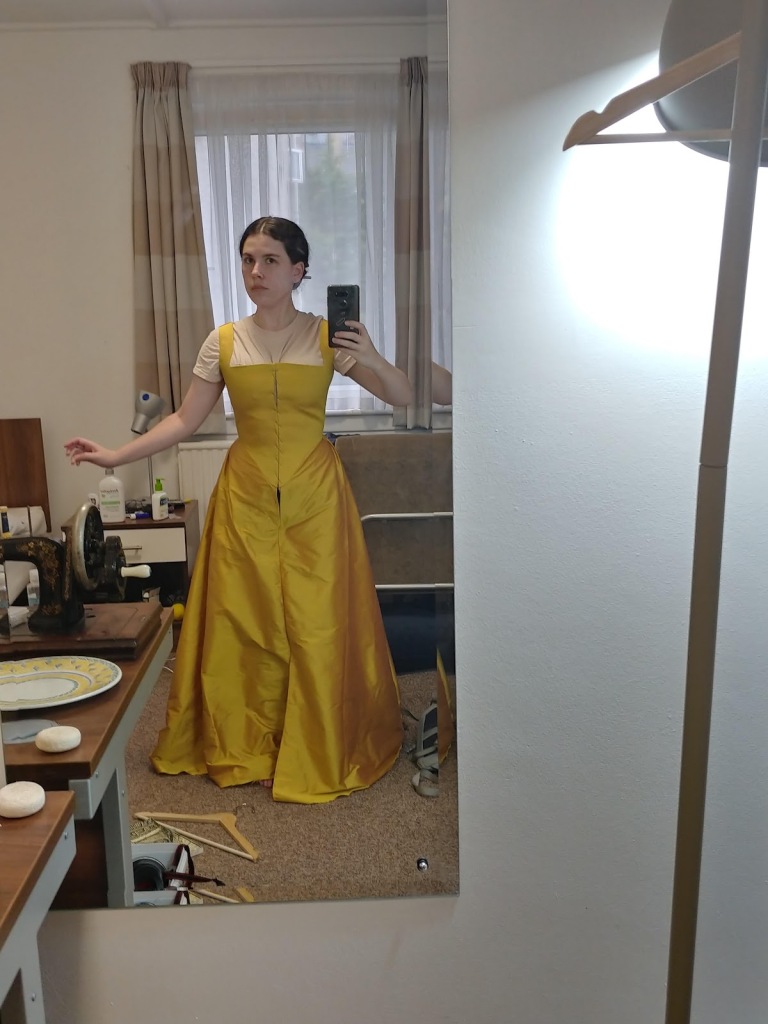
For whatever reason I’m not a fan of the fluffy partlet, so I’m reproducing the buttoned-up style shown earlier. This consists of a sottana (kirtle, which can be worn on it’s own with sleeves for a less formal look), doublet, matching skirt, and gown. The doublet and skirt were going to be from the brown changeable taffeta I got in the fashion district and the gown from the voided black velvet. For the sottana I decided I would use some very bright yellow silk I bought at Discount Fabrics in Berkeley prior to my move to Glasgow.
Now, I had to actually make the lot. I’m kind of a perfectionist, and kind of obsessive about materials and details, so this was easier said than done, and I had quite high expectations for myself. These materials are expensive (particularly by my standards– I mostly make peasant clothes for a reason) and I wanted to do this correctly.
I’ve found in the time that I’ve been costuming that some people’s upper status clothes just look….right, where as some miss the mark in small ways. I’ve spent a lot of time looking at pictures trying to figure out what I think really makes a costume (particularly a high-class/fancy one) really feel correct and make you go “wow!” when you see a picture. A few things I’ve noticed are:
Fit/structure. A lot of clothing is beautifully made but just doesn’t have that smooth fit you see in portraits. These are, of course, somewhat idealized, but if you look at the paintings I’ve posted you can see that they have shown natural wrinkles and creasing, particularly under the bust. That being said, the fit is really good and the line is smooth. These people had their clothes custom-made, and they fit. There also needs to be enough structure to hold everything smooth and shape the body into the correct silhouette…. without so much structure that it is rigid and uncomfortable.
Unless you are doing Spanish. Then rigid and uncomfortable is kind of the look you are going for.
As I mentioned in my 1570s middling entry, current research suggests that boned support garments were not worn until the late 1590s, and then only by the very wealthy. If you look at the Florentine styles of the 1570s there is clearly a lot of structure and support in order to give that smooth line, but it doesn’t look like any of the layers are boned. There is a gentle softness and curve to the bust, which you don’t get with, say, fully boned bodies or stays. Whatever is being used as the stiffening layers has body and support, but also some give.
There are different ways of achieving this– Samantha Bullat (Couture Courtesan) has had beautiful results using home-made buckram. Matthew Gnagy in the Modern Maker books suggests using multiple layers of canvas padstitched together with wool padding. I used linen canvas fairly successfully in my previous attempts at 1570s styles, but wasn’t entirely happy.
In the meantime I started (and somewhat abandoned) a Florentine 1520s dress designed for hot weather, where I managed to get enough support (for my body, which is small and solid) from two layers of shirt-weight linen padstitched together. The shape of that period is even softer through the bust, so I didn’t want to do the exact same thing for this garment, but I thought maybe using a couple of different materials padstitched together would be a good compromise. It would allow me to avoid the work and layers (hot! No!) involved in Gnagy’s approach.

This was my solution. The fronts are a layer of hair canvas and a layer of French linen collar canvas (both from MacCulloch and Wallis, London) padstitched together. The straps and the side seams, which are on the bias, have been re-inforced with an additional strip of straight-grain canvas. The back is just the canvas with no padstitching, since it just needs to hold a smooth line and not support the bust or the point. The pattern was drafted using the bara method.
Obviously none of the portraits above show the kirtle/foundation layers, but based on the pattern diagrams for kirtles in Juan de Alcega’s cutting manual this really should be laced up the back, not the front. However unlike Eleonora da Toledo or Marie de Medici I don’t have a maid with me at SCA events, so until that is the case I need to be able to dress myself. As a compromise for having the lacing at the front there is one piece of synthetic baleen right at that edge for the lacing to pull against, but no other boning. Queen Elizabeth’s Wardrobe Unlocked mentions that busks were imported from Italy into England starting in the 1570s, so there is definitely justification for some additional stiffening at the front (and increased evidence that these kirtles would be back laced, but I refuse to make back lacing garments. No.)
The next step is to flatline the silk outer layer with the quilted and fit-tested canvas. With my 1570s English middling kirtle and my abandoned 1520s Florentine dress I had to smooth and stretch the outer fabric over the canvas to prevent bubbling, as the lightweight linen and wool were both prone to stretching. However, when I came to do that here…I discovered a problem.
Although both of those projects involved multiple layers of material stitched together to form the stiffening layers, they had primarily been worked flat. In this case while padstitching the canvas I chose to roll it over my finger vertically (as suggested by Matthew Gnagy in the MM V2) to imitate the effect of boning. This also caused the canvas to contract some. When it is placed under tension (ie, on a body) it returns to its original configuration. But the fact that my base layers were now, for lack of a better term, “stretchy”, made flatlining the silk seem like a nightmare. No matter how much I smoothed and basted it just kept bubbling!
After seeking some advice on the Elizabethan Costuming Group on Facebook, I decided to just try it on and see if it worked under tension. Lo and behold….


Hey look. It’s fine, other than the fact that the seam allowances on the silk haven’t been turned under and it’s messing with the neckline! The two horizontal creases from storing the fabric folded for more than a year go away once there is some vertical tension as well as horizontal (ie, when I finished the edges).
Although my understanding is that historically the edges would have been turned under and held in place with a prick stitch, I decided to use herringbone stitch instead. There are debates as to whether or not herringbone stitch is documentable to the 16th and 17th centuries, but as this silk frays a LOT and I wasn’t planning on lining the kirtle, I didn’t want to risk just using a prick stitch. Especially since I had to clip the seam allowance pretty close to get the corners of the neckline to turn properly.
Continuing my use of handsewing-that-really-is-in-the-wrong-century, I used a mantua maker’s seam to sew all the skirt seams other than the CF, which needs to be finished separately for the slit and placket. Once again, I have no documentation for this prior to the 18th century but it makes a beautiful, fully-finished handsewn seam in one pass and that is too good of a deal to pass up. In period they likely would not have finished their skirt seams, but this silk frays and so I chose this technique as something simple, quick, and effective. And as I keep reminding people absence of evidence ≠ evidence of absence, so I’m just gonna keep choosing the stitches I think make the most sense for a given application.
The next step after turning all the bodice edges under was to attach the skirt. Simple, right? Straightforward? I attach a lot of skirts to a lot of bodices, for everything from 1490 to 1912, I really should have the hang of it by now.
Yeah, well, not so much, because while it isn’t clear if the Italian dresses of this time period had flat-fronted skirts (ie, no gathering across the front), the Spanish ones definitely do. Some seamstresses (including Isabel Maria del Aguila, OL) believe that the Spanish dresses have no gathers at all, and have a fully tailored waistline (see here, pg 6). I wasn’t emotionally ready for that, and when I drafted the skirt using Gnagy’s method the waist was much larger than my waist, so I don’t think he intended that either. Plus the Italian veste have pleated skirts, even in the front, so I figured gathers in the back were probably a good call.
I had also never attached a skirt to a bodice with a deep point like this, which requires that you level the skirt while attaching it, instead of just sewing the top edge of the skirt to the bottom of the bodice and hope for the best. If you try and do that it’ll gape really badly, so you need to adjust the amount of overlap between the skirt and the bodice to make it hang straight.
That likely wasn’t a good explanation, probably because I didn’t end up doing this very well in general. The skirt was pulling a lot across the front, and I ended up having to adjust it a couple times to try and bring more volume to the front so that it didn’t gape. I’m not sure how on earth you do this with a completely tailored waistline (maybe a lot more flare in the gored panels??) because I was struggling with this, and I barely have hips.

However, after un-attaching it and re-attaching it about five times, I got it to stop pulling! So, up next (and last, until I get to the partlet and doublet) are the sleeves.
Which were a lot of work. And they still need more, really.

I basically made this as I will for the doublet of this set (when it exists) with regular lines of horizontal trim with pinking in between. The trim is antique and real metal (I. LOATHE. Lurex) from Tinsel Trading.
Matthew Gnagy has a pattern specifically for sleeves with horizontal trim, so I basically used that but with a bit of fullness removed, as it makes quite a voluminous sleeve. I cut the pinks before doing all the stitching incase it went horrifically wrong, and lined it with a brick-y red silk in the hopes that it would peak through the cuttes, but it doesn’t really.
Of course, being me and therefore continually photographic-challenged, I took the only good photos I have of this set in my living room before I hemmed the sleeves. I’m sorry. This is just who I am, and why I will never be Insta-famous.

A few notes:
I’m really happy with how this turned out! It was a lot of work, but it’s so pretty, and I’m proud with the work I have done
The pendant is from Armour and Castings, it is perfect and gigantic and extra and I love it, and the strand of pearls I bought for it to sit on is waaaaaaay too short. I need to get another one
The sleeves really need piccadils at the wrist, but I’m pretty sure the extra silk from this is at my parent’s house, so that isn’t happening anytime soon
Lastly, this set is not comfortable for my modern sensibilities. You can’t slouch. You can’t even lean against a chair back. This is true of my 1570s middling set too, so you would think I would be used to this, but I actually subluxed my shoulder blade at the event and had to find a chiropractor friend to reset it. I was sore enough that I took the dress off and spent the rest of the day just in a t-shirt and leggings.
Lesson learned: if you make a very rigid, tailored piece of garb, bring something else to change into.

One thought on “Fancy Fancy Florentine Sottana”